
Jewelry dishes are very useful for keeping rings and other often worn jewelry safe. I still use the round white resin and gold flakes one I made in this past tutorial. (I gave away the other). I keep it near my bathroom sink to temporary hold my rings when I am washing my hands.
When Fran of Little Windows sent me her latest 3-in-1 heart silicone molds for review, I jumped at the chance to make more dishes. For this time, each dish can be made as a whole rather than putting together two resin pieces as in my previous tutorial.
There are 4 sizes in this set which also includes, an info leaflet, templates and some 600 grit wet and dry sandpaper.

I used Little Windows' Brilliant Resin ( Readers get a 15% discount by using this code BG1516). A safe resin, I also like it because it is very clear for both doming and casting. It is also a low bubble producer. Also see this post which is all about safety precautions with epoxy and uv resin.
The resin comes with stir sticks and measuring cups. You can reuse the stir sticks and measuring cups if you wipe them clean at least twice with paper towels.

The smallest heart mold are suitable for jewelry making. One thing to note about adding colorant. You do have to be very consistent with the amount of resin and the precise number of alcohol ink drops you use if you wish to replicate the same shade for an identical piece,

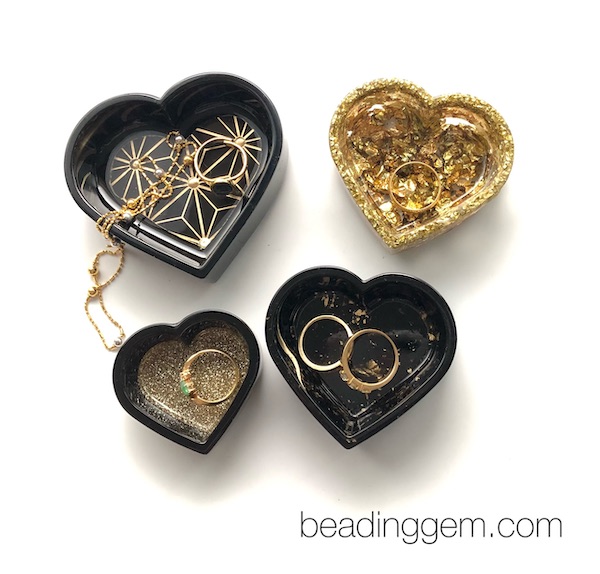
I used all four sizes for making my dishes. The black and gold color combination is really elegant - I used it for my gift bag paper and resin jewelry tutorial not long ago. So it features in 3 of the 4 dishes I made.
One side of the mold creates a solid heart. I turned it over to use the other side for making the dishes.

Fran gives the amounts of resin you need for solid hearts in her leaflet. But what about dishes? There is an easy way to figure it out!
First pour some water into the heart mold as if you were pouring resin. Right up to the top .

Now transfer the water in the heart mold into the blue measuring cup provided by LW. You should be able to read off how much water there is. In the case of the largest heart mold, you will need approximately 45 mL. It's best to always make up a little more than you need.

I used both clear and black resin for my heart molds. I used LW's black colorant. Put in enough drops so it is opaque.

I made the largest heart dish an all black one.

I then checked for bubbles, covered it up and let it cure overnight. I used the same gift bag paper from my last tutorial. I used the template provided by LW and drew out the large heart before cutting it out.

I could have used black marker pen to darken the white edge. But I used a gold leafing pen instead. There are many such pens as well as gold marker pens on the market.

This time, I used Hypo Cement to glue down the cured black heart. I'm not keen on E6000 because it can get messy and I do not want glue on other parts of the heart.

Once the glue is dried, I added a thin layer of clear resin to protect the paper. Pop any bubbles, cover and cure overnight as usual.
All the other heart dishes required just two pours except for the clear resin one I made - I needed 3. It was also the messiest one I did.
The first resin layer reached about halfway up.
I added heavy gold glitter and let the little chunks sink to the bottom.

I then transferred little chunks of variegated imitation gold leafing foil to the resin. This was easier said than done! In reality, the bits just stuck to my gloves!

I let the first layer cure and then poured more clear resin to the top. I added more foil bits and tried to distribute them as much as possible. I let this second layer cure. The result showed a thin layer filled with fine foil dust between the two resin layers! Ah, well.
I also had to pour a third layer of resin at the bottom of the dish because bits of foil make it bumpy.
I also experimented with an all black heart dish flecked with imitation gold leaf flakes. You do need quite a lot so don't use real gold ones! I just piled a whole bunch and then pushed them into the resin as evenly as I could.

It too turned out to have a bumpy bottom because of the gold flake inclusion. So a final layer of clear resin was added before covering and curing.

Enough of the gold flakes showed through to make this dish look expensive!

If you don't want to add paper cut outs, the easiest way to get the gold and black combination is to fill the mold to the level of the internal heart "shelf" with black resin and let that cure overnight. Next
add a layer of clear resin with fine gold glitter mixed in for the bottom of the dish.
Here is the side view :

At a certain angle, the glitter reflects off the very smooth black walls of the dish!

I did find that some of the dishes needed sanding down at the bottom edge to make it smoother. So I used the wet dry sandpaper provided to sand it down a bit.

My nails already take a beating doing crafts. So unlike Fran, I prefer to use a tool to pick off bits of cured resin from the molds after use. The stirrer stick is doubly useful!

I also used LW's new Creation Station to keep curing pieces dust free. As you can see, I make several projects so the ability to stack another project on top was useful as space in my studio is limited. I only have the one Creation Station but you can stack them up. They can be used for all sorts of craft projects on the go, not just resin ones.

These make great gifts - not just for Valentine's Day either!
Fran's tutorial on how to use Little Window's 3-in-1 heart silicone molds also shows the Creation Station in use.
Photography
I used my iPhone 8+ for final product photography in natural light. I used the Orangemonkie studio which comes equipped with LED lights - for artificial light photography in my windowless basement studio. The Foldio2 Plus is excellent . I use the Foldio3 because I need the room for tutorial photography. My online class Easy Guide to Smartphone Jewelry Photography is now available. Read more about it here.
Before You Go :

This blog may contain affiliate links. I do receive a small fee for any products purchased through affiliate links. This goes towards the support of this blog and to provide resource information to readers. The opinions expressed are solely my own. They would be the same whether or not I receive any compensation.
______________________________
Original Post by THE BEADING GEM
Wow, I love those hearts! Great molds.
ReplyDeletePearl, I can see you getting lots of good use out of the Creation Station. You'll need a new excuse though to buy chocolate just for the dust covers ❤️
ReplyDeleteLOL! I only have one Creation Station so I am definitely still buying chocolate and yummy snacks for the plastic covers!
DeleteOoh, the black and gold is gorgeous! I love them all Pearl :)
ReplyDeleteThey all turned out beautiful! LW does have the best molds.
ReplyDelete