This tutorial was inspired by Spoonfed Design's Photoshop tutorial on how to place jewelry images onto other photographs. The picture you see on the left is a composite of a stock picture showing a hand and one of my tiger eye bangle bracelets.


The Spoonfed Design blog uses the full Adobe Photoshop software which is too expensive for most of us. So I tried it out using the simplified, much easier to use and also considerably cheaper version called Adobe Photoshop Elements which I highly recommend. I also had some invaluable pointers from my 14-year-old daughter who is a whiz on this program.
The basic steps are the same whatever program you use - Coreldraw or the free GIMP software. You'll just have to find the equivalent tools or procedures and realize each software will use different terminology.
1. First find photos that are likely to go together. It doesn't have to be a model - perhaps a different background like a sandy beach or whatever. Open both up in Photoshop Elements.
2. Resize one or the other photo so the relative sizes look okay because you are going to copy and paste the jewelry onto the main picture.

3. Now get rid of the outside background in the jewelry picture. Select the magic tool on the vertical menu. Play around with the tolerance number (top circle) - I used 50- so that when you click with the cursor anywhere on the outside background of the jewelry picture, a "marching ants" border appears. This border will show you the area that will disappear when you hit the delete button.

4. Now try clicking inside the bracelet. If the marching ants border is okay with you, then delete. To clean up the remaining background, switch to lower tolerance numbers - I used 20. Don't worry if you haven't got it perfectly removed.
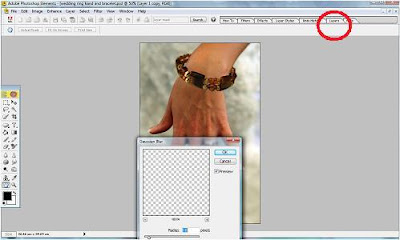
5. Now select the repositioning and rotating tool (circled below)so you can grab the bracelet and put it where you want it to go in as natural a position as possible.

6. The next tool to select is the eraser tool on the vertical menu. Set the brush size (up top) to however wide you need it to be - big to erase large areas, small to tidy up the little ones. You may wish to zoom in to see better.

7. Clean up the little areas with either the magic tool or the eraser.
8. As the jewelry looks a lot sharper than the background, the bangle needs to be blurred. So for the final step, create a new layer (check the help for layer info) and give it a Gaussian blur to soften the bangle itself.
This was a quick effort on my part. So the composite picture is not perfect by any means. But you get the picture (pun intended)! Isn't technology cool?
______________________________
Original Post by THE BEADING GEM
Jewelry Making Tips - Jewelry Business Tips


The Spoonfed Design blog uses the full Adobe Photoshop software which is too expensive for most of us. So I tried it out using the simplified, much easier to use and also considerably cheaper version called Adobe Photoshop Elements which I highly recommend. I also had some invaluable pointers from my 14-year-old daughter who is a whiz on this program.
The basic steps are the same whatever program you use - Coreldraw or the free GIMP software. You'll just have to find the equivalent tools or procedures and realize each software will use different terminology.
1. First find photos that are likely to go together. It doesn't have to be a model - perhaps a different background like a sandy beach or whatever. Open both up in Photoshop Elements.
2. Resize one or the other photo so the relative sizes look okay because you are going to copy and paste the jewelry onto the main picture.

3. Now get rid of the outside background in the jewelry picture. Select the magic tool on the vertical menu. Play around with the tolerance number (top circle) - I used 50- so that when you click with the cursor anywhere on the outside background of the jewelry picture, a "marching ants" border appears. This border will show you the area that will disappear when you hit the delete button.

4. Now try clicking inside the bracelet. If the marching ants border is okay with you, then delete. To clean up the remaining background, switch to lower tolerance numbers - I used 20. Don't worry if you haven't got it perfectly removed.
5. Now select the repositioning and rotating tool (circled below)so you can grab the bracelet and put it where you want it to go in as natural a position as possible.

6. The next tool to select is the eraser tool on the vertical menu. Set the brush size (up top) to however wide you need it to be - big to erase large areas, small to tidy up the little ones. You may wish to zoom in to see better.

7. Clean up the little areas with either the magic tool or the eraser.
8. As the jewelry looks a lot sharper than the background, the bangle needs to be blurred. So for the final step, create a new layer (check the help for layer info) and give it a Gaussian blur to soften the bangle itself.

This was a quick effort on my part. So the composite picture is not perfect by any means. But you get the picture (pun intended)! Isn't technology cool?
______________________________
Original Post by THE BEADING GEM
Jewelry Making Tips - Jewelry Business Tips
Hey Pearl! You should put that photo on your bracelet listing with The Bead Sisterhood! At first I thought it was the ring that was photoshoped in... so it really looked natural... Impressive!
ReplyDeleteFabulous tut! I have photoshop and have used the magic wand before...although I didn't know about the tolerance level. Hmm..will have to check that out. Thanks Pearl!
ReplyDelete-Stephanie
Very nice! Need to bookmark that tutorial!
ReplyDeleteSuper! I hadn't thought of doing that with my jewelry photos, even though I Photoshop my Coffee Pot People into scenes all the time. (*slaps forehead*)
ReplyDeleteAnother nice bit in Elements is a tool under Filters called "Remove camera distortion". Using that, you can change the "tilt" of a piece that isn't positioned perfectly for the hand you're using. I love it.
Thanks for the tip, Anitra!
ReplyDeletei would have used the 3d edit tool to give it a slight more of a perspective angle. otherwise, good job.
ReplyDelete~A Professional Photoshop Artist
Thanks for the comment, Professional Photoshop Artist - from this totally amateur Photoshop Wlements user!!
ReplyDelete