
The spooky season continues with die cut Halloween decorations! This post was inspired by my old Fall wreath which was looking drab this year. So I dressed it up with die cuts from my new Halloween SVG cut file. There is 10% off on this as well as my other Halloween laser cut wood designs introduced on Monday.
You can scale the cuts to whatever size you want. You can also use them as bold jewelry.
Seriously, owning a Cricut or Silhouette opens up so many new possibilities as you can die cut many different things - jewelry , crafts, card making etc. These electronic die cutters can cut faux leather which is usually made from PVC. In contrast, this material cannot be cut by laser cutters due to the hazardous gases produced during the burning process.
I have the Cricut and I used it to cut the Halloween round frames out of Cricut's premium vinyl in bright orange as well as their faux leather . There are other brands of faux leather but most are thicker and harder to cut than Cricut's faux leather.

I sized the circles larger than I would for jewelry - 2 inches in diameter. You can go even larger if you want to make decals - cutting off the tabbed holes is a breeze.
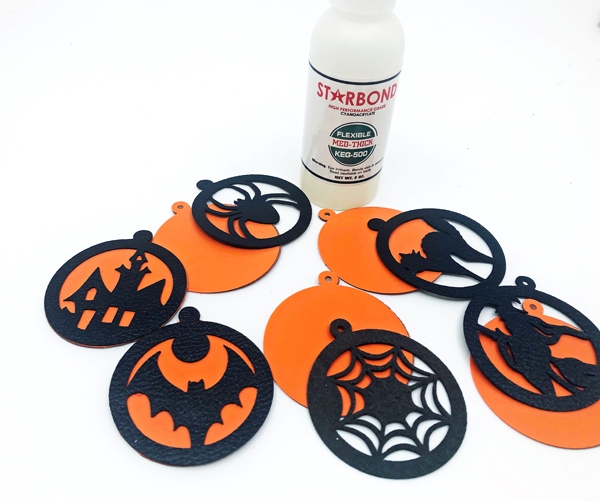
The self adhesive premium orange vinyl was adhered to the black faux leather plain round circles.

I had to go with three layers in order to have the black outlines on top. I cut plain round shapes from both the vinyl and faux leather - I did not have enough black so I used a brown color.
I stuck the adhesive vinyl over the wrong side of the brown cut outs.

Then I used Starbond, an excellent craft glue I now use instead of Super New Glue. Get a 15% discount by using this code : BGSB15.
I typically use the Medium for most projects and the Flexible which is great for leather and vinyl work like this. You can also purchase the Medium and the Flexible from Amazon.

The nozzle makes it easy to apply the cyanoacrylate adhesive on the backs of the die cuts. You do have to work fairly quickly. Fortunately I weeded out the remaining block on the web in time!
 No one is perfect, least of all, me. So I did have to trim some of the edges where the orange showed through.

The Cricut cutting blade has its limitations so sometimes I have to help cut out the holes properly with my 1.8 mm punch pliers.

I then cut out 4-5 inch lengths of 26 G Parawire . Each wire length was doubled and put through the hole. The wire ends were then fed through the loop end and then pulled tight.

I played around with positions while the wreath was on the floor. But it is much easier to attach each decorative item while it is hanging.

Once attached, the wire ends were twisted together and tucked out of sight.

Viola! A festive front door in next to no time!

Before You Go:
Disclosure
This blog may contain affiliate links. I do receive a small fee for any products purchased through affiliate links. This goes towards the support of this blog and to provide resource information to readers. The opinions expressed are solely my own. They would be the same whether or not I receive any compensation.
______________________________
Original Post by THE BEADING GEM
Jewelry Making Tips - Wire JewelryTips -Jewelry Business Tips
The nozzle makes it easy to apply the cyanoacrylate adhesive on the backs of the die cuts. You do have to work fairly quickly. Fortunately I weeded out the remaining block on the web in time!


The Cricut cutting blade has its limitations so sometimes I have to help cut out the holes properly with my 1.8 mm punch pliers.

I then cut out 4-5 inch lengths of 26 G Parawire . Each wire length was doubled and put through the hole. The wire ends were then fed through the loop end and then pulled tight.

I played around with positions while the wreath was on the floor. But it is much easier to attach each decorative item while it is hanging.

Once attached, the wire ends were twisted together and tucked out of sight.

Viola! A festive front door in next to no time!

Before You Go:
- Fixing My Pliers with Starbond Thin Super Glue
- Halloween Inspired Wire Work Jewelry Designers
- How to Make Pumpkin Jewelry Tutorials
Disclosure
This blog may contain affiliate links. I do receive a small fee for any products purchased through affiliate links. This goes towards the support of this blog and to provide resource information to readers. The opinions expressed are solely my own. They would be the same whether or not I receive any compensation.
______________________________
Original Post by THE BEADING GEM
Jewelry Making Tips - Wire JewelryTips -Jewelry Business Tips
These are really great patterns and the wreath came out fabulous!
ReplyDelete