A long time ago, I bought some long crystal shaped silicone molds such as these below from ezrts. I was slow to try them because I thought it would be difficult to remove the cured resin.


This tutorial involves real dried flowers and leaves which is trickier but you can add anything you want to resin if not botanical materials. The feature botanical here is the lavender flower stalk because it is tall and thin!
I've covered drying plant material before. See this tutorial for microwave pressing technique and this one for burying and drying in silica.
I used Little Windows' Brilliant Resin which is a very safe 2 part epoxy resin to use and it is also a low bubble producer. It is made in California. Readers can get 15% off with this discount code : BG1516. You can either mark the levels you want on the little cups or weigh the resin for this 2 :1 mix resin.

Brilliant Resin is both a casting and doming resin. It's a good thing it is a low bubble producer (just make sure to microwave Part A for 6-7 seconds before mixing) because doming resin tends to trap the bubbles more than the kind of resin formulated to cover art canvases. That's due to a greater surface tension.
Waving a flame works really well for resin designed to be used in shallow layers as the heat allows the many bubbles to rise and quickly pop. This technique does not work well with doming resins and certainly not for a mold that is so deep.
The best approach is to slowly pour the resin in at an angle. If you have the patience, do it in batches, tapping the mold for a short while in between additions, to encourage the bubbles to rise to the surface.

I found that it was best to fill the mold about 3/4 to the top before trying to dip in the fragile dried flowers. Go carefully. It helps to keep hold of the top of the flowers and gently immerse the material in resin. Raise it out of the mold for a minute or so to allow any bubbles on the thin resin layer around the plant material to pop before slowing putting it back. Bubbles are still inevitable unless you have a vacuum degassing chamber or pressure pot as it is sometimes called. (It's not cheap as you also have to have a vacuum pump.)

Cure overnight.
The mold on the left contained pressed flowers and leaves which means they are flattened. The others contained dried in silica flowers.

Here's a quick video which shows the difference between unmolding the three molds. The first one with pressed material does show the flattened look when the mold is viewed in different angles. The second mold was a disappointment because it had decorative lines which did not enhance the dried flowers. The last one was the mold with no slits. It took longer using soapy water but not that much longer. Once I got the soapy water to get well down the side and squeezed the mold a little a few times from the bottom, it soon popped out like a popsicle!
Once cured, I sanded down the top with wet/dry sandpaper 400 grit. I see no need to top up with fresh resin the part will be covered with some sort of bail or wire wrapping.
How does one finish a long resin pendant? One easy way is to use a glued in screw pin teamed with a bead cap as shown in this lovely pointed end mold from CloneMold. It's bigger than the ones I have which will allow larger inclusions.

I also bought these but haven't used these larger molds yet. You can get whichever shape you like from vendors such Venissso. I placed my smaller mold next to this set to show the relative sizes. These molds sit on little "feet" so they are stable. The large hole at what would be the back should allow for larger materials to be placed inside and for removal after curing. The only issue is to add more resin after curing as there may be a little dip in the shape at the back part.

Some of the prettiest molds I have seen are the pendulum style molds with faceted and broader tips like these gorgeous shapes from beespo. But the only way to get cured resin out of these is to pre- slit the molds.

The crystal shapes can also be wire wrapped - see examples here. These designers use the "hippie" wrap to ensure a secure hold. However, if you want to use real flowers, this kind of wire wrapping will obscure the view of the dried material.
So I tried the traditional way of wire wrapping cabochons using 3 lengths of square wire for the frame and half round wire for the wrapping. My favorite brand is Parawire. The silver plated copper-cored wire is itself coated so it will not tarnish.
Cut 3 lengths of square wire, each measuring 2 x the height of the piece plus a generous 7 inch extra.

There are tons of tutorials everywhere for making the basic cabochon wrapping so here are my highlights and tips using the technique on this finished resin piece.
I banded the group of 3 with half round wire at what would be the base of the pendant. Tip - use masking tape to hold the group together where needed - the square sides allow you to butt each wire against the other. When you trim the wire, the cut ends should ultimately be on the inside and not visible.

You could band the other two sides while the wire group is still straight. I didn't until I had bent the wire bundles up the sides.


After banding the sides, it's time to bend at 90 degree, at the top. I need to use my magnifying glass to see if the square wires are still lying against each other!


Put the wire ends together and trim them evenly before making the bail.


Disclosure

I splayed out all six wire ends. I isolated two central wires - one from each side bundle and using a length of half round wire, I wrapped it at least an inch worth for the bail.

I then formed the bail.

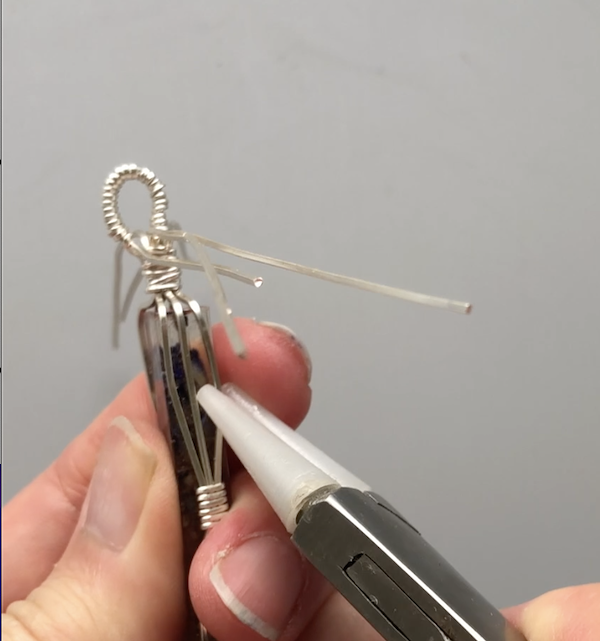
Care must be taken not to scratch the resin. I had a pair of these nylon tipped round nose pliers which I had never found useful until now! They were great for pushing apart the outer wires of the bundle without harming the resin.
All four remaining wire ends were scrolled. I like to keep hold of the scroll with my nylon wire straightening pliers. This hand is kept still during the scrolling action. My left hand does the work moving everything else. It is a common mistake to move the tool hand!

The larger four scrolls were placed around the bail area - they look a little like a bead cap. The bail ends formed two smaller scrolls front and back.
The arrows marked where I had pushed the outer wires to sit just over the front and back of the pendant. This secures the resin piece - it stays put! Note 3 wires in the frame just about worked. I would have had to use more wires in the bundle if the piece was any thicker.

Here is the final piece - the dried lavender resin pendant posing with real lavender flower stalks! The drying and embedding in resin changed the color of the flowers from its natural hue. (Note : I chose smaller stalks for the resin work)

Photography
I used my iPhone 8+ for final product photography in natural light. I used the Orangemonkie studio which comes equipped with LED lights - for artificial light photography in my windowless basement studio. The Foldio2 Plus is excellent . I use the Foldio3 because I need the room for tutorial photography. My online class Easy Guide to Smartphone Jewelry Photography is now available. Read more about it here.
Before You Go:
This blog may contain affiliate links. I do receive a small fee for any products purchased through affiliate links. This goes towards the support of this blog and to provide resource information to readers. The opinions expressed are solely my own. They would be the same whether or not I receive any compensation.
______________________________
Original Post by THE BEADING GEM
slitting the mold is genius! I have used some of those long molds and ended up frustrated trying to de-mold, even with soapy water. I'm loving the wire-wrapping, it dresses up the piece so much! thanks for sharing.... now, where did I put those molds......
ReplyDeleteI had to find my long molds too before I could do this project!
DeleteNice job Pearl! The lavender is a good choice for this shape.
ReplyDeleteThanks Aims! I also like perennial salvia for the stalks.
ReplyDeleteAnother great one Pearl! So many tips for the resin work and the wire wrap, and you describe everything really well in addition to just-right close-ups. I feel like I can do this! Did you have any trouble with seams on the ones you slit, or did the rubber banding prevent that?
ReplyDeleteNo problem with the seams. The rubber bands were sufficient to keep the edges together. The resin mix is quite viscous so it doesn't flow out easily.
DeleteThank you again for so many useful tips! The wire wrapped pendant is beautiful!
ReplyDeleteThank you for your kind words!!
Delete