Making real flower resin jewelry is a lot of fun (see past tutorials in the links below). But the flowers and leaves have to be on the small side. What about larger specimens? Use them for real flower and leaf resin coasters!
I've covered the main steps before. It is important to dry botanical materials otherwise these will rot inside the resin. Using a microwave press not only shortens the drying time to literally seconds but also helps preserve the colors before embedding in resin. Drying and pressing the traditional way means the floral colors could fade over several days or weeks.
I use the ceramic microwave flower press from the Canadian Lee Valley company. This one is also pricey so you might want to check other makes like this one. You do have to experiment with how long to microwave the floral materials. There is a tendency for some flower colors to darken during the process.

I also previously demonstrated how using a laminator helps to quickly seal the dried flowers and leaves from the air and will protect them from the resin. Some flower colors go translucent when you put them into the resin. The laminator model I use is the Apache. Either the 3 miL or 5 miL sheets work. I do cut strips as I do not need the entire page width most of the time.

As you can see, laminating floral designs can be carried out well ahead of time. The flowers and leaves have been preserved and can be left like that until you are ready to make the resin coasters.

I use Little Window's Brilliant Resin , the best jewelry grade resin I have ever come across. It's a low bubble producer, has a long shelf life and is not toxic. Note that all resins, no matter how good, will yellow with time. So always store the bottles and cured resin pieces away from extreme heat and light.
Readers get a 15% discount from Little Windows. Use this code : BG1516.
I've previously used round silicone mousse pans before for my sea glass and sea shells resin coaster tutorial. If you have them and wish to use them, just use less resin.
For this tutorial, I experimented with square shallow molds - mine are 10 cm. But you can also get 11 cm ones.

As I was going to test 3 different backgrounds, I made up 120 mL of Brilliant resin according to the instructions. I use a reusable silicone measuring cup. See this tutorial on how to clean it.
The resin mix was divided into 3 portions, each a little less than 40 mL. I did a "wet" run with water prior to determine just how much resin I needed to just cover the bottom of each mold.
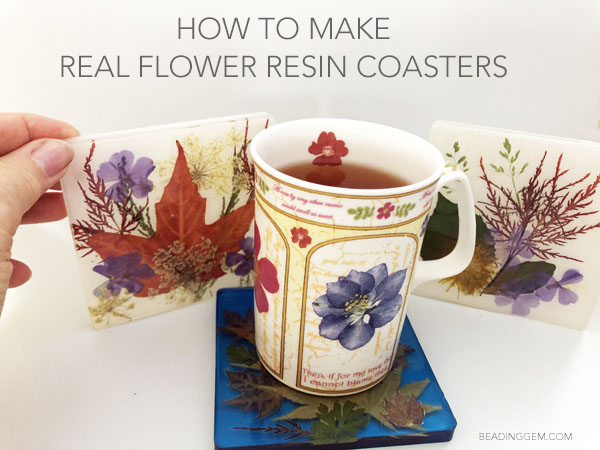
For one coaster I used plain white resin colorant from Little Windows. For another I tested out white Pinata alcohol ink mixed with pearlized mica powder - lots of brands like this one. For the third one, I used a blue resin colorant. All three worked. Just a question of preference! Alternately, you could just use clear resin. Indeed most, if not all, real flower resin coasters for sale on Etsy are clear ones.

The first layer is the base.

After checking for bubbles, I covered the molds up and left them to cure overnight.

I used some colored paper to make a template to fit the molds.

I then placed the paper template beneath one of the laminated designs and marked the cutting lines using a black marker pen.

Once the correct shape has been cut, remove the black marker pen marks with some isopropanol or rubbing alcohol from the drugstore.

I then decided which lamination looked best with the 3 different backgrounds I had. Then I mixed a fresh 120 mL batch of resin and divided it into 3 portions as before. I poured each portion into a mold.

Take this step real slow. Ease the laminated design sideways into the clear resin. Do not move too quickly or you will have a resin tsunami on the other side!

Working slowly means no major air bubbles will be trapped underneath the lamination. Pop any stray bubbles - particularly at the edges.

Cover and cure overnight. It helps to come back and check the coasters a couple of times early in the curing process as late bubbles might emerge.

Once cured, the coasters peel easily away from the molds. Sand the rough edges using 400 grit wet-dry sandpaper under some water to contain the dust. There appears to be a slight lip to the edges so you may wish to use a coarser sandpaper to quickly remove these higher parts before switching to finer sandpaper.

I missed some bubbles here :

I thought that the white background was great for the pressed flowers and leaves. The pearlized one was especially pretty. Blue worked for the predominant leafy coaster. I probably would not use this color for flowers as it would detract from their loveliness. A clear background will also work especially on wooden tables.
Have fun with this project. The fall leaves are still to come! The maple leaf you see in the left coaster below was collected last autumn.

Before You Go:
Disclosure
This blog may contain affiliate links. I do receive a small fee for any products purchased through affiliate links. This goes towards the support of this blog and to provide resource information to readers. The opinions expressed are solely my own. They would be the same whether or not I receive any compensation.
______________________________
Original Post by THE BEADING GEM
<3
ReplyDeletethese are beautiful! with holes drilled in the top corners, chain added, they would be great suncatchers too. lovely job!
ReplyDeleteMore natural beauty captured, I love these Pearl! It's great to have alternatives so you can make this work with supplies you may have already. Keep creating :)
ReplyDeleteWhat a fun project! Turned out beautiful!
ReplyDelete