
Long time blog readers might remember my tutorial on how to make flower earrings from recycled soda cans. That was ten years ago! Time to update it. I previously used an aluminum disc as the base. So in the spirit of upcycling as much as possible from cans, I am revisiting the tutorial.
This tutorial uses ordinary paper punches. I will also include the alternative cutting tools and techniques you can use.
Cutting open the can is a pain. I didn't have much luck with thescientistformerlyknownasNaegeli's method - see this post for the links. He uses an X-acto knife. Pcspinners shows how to score the can first with the knife. I also like his easy way of flattening a can :
However, if you are as wary as I am with such use of X-acto knives, here is what I do. I use a smooth edge can opener which cuts differently from conventional can openers. The blunt edge reduces the chances of cutting yourself and the lid doesn't drop into the can.

I recommend you use proper work gloves to protect hands from sharp edges. Get those which are designed for women - it is very awkward to work with overly large gloves. Good gardening gloves will work.
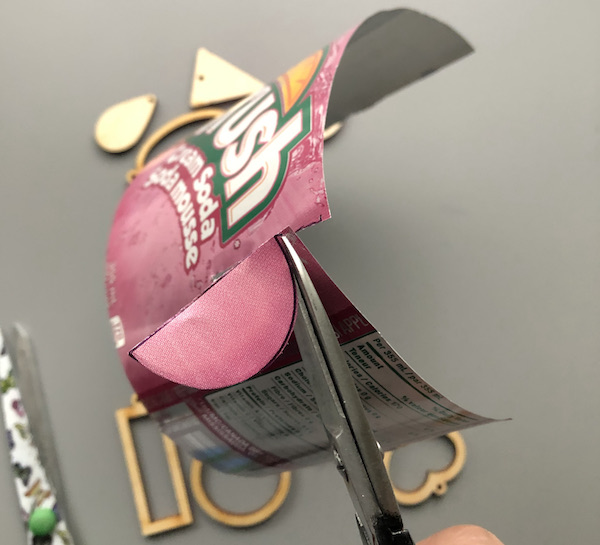
Use metal snips if you have them. I found an inexpensive pair of scissors from the dollar store works just as well. The workable metal is the flat part. So the first cut is down the side of the can then along the bottom edge.


Create your own "sharps" container with all the bits and pieces for recycling. I also use an unwanted cardboard box, taped up and clearly marked for the recycling people.

Now the fun part. I cut out 6 pink flowers from this particular soda can.

Then 6 discs from the less interesting parts of the cans using a 1.5 " round cutter.


I then tape each 3-layer group with masking tape to keep them together.

I like embossing for 3 reasons. First you work harden the metal which then locks the layers together and lastly, it's pretty!


This particular die cutting machine has a multi-purpose platform (other brands might have a dial to control thickness) with a tab system to quickly change the thickness of what is being processed. I flipped the first tab open and laid the closed folder (between the 2 clear sheets) on the platform and then rolled the lot through. Other embossing folders might be thicker or thinner so adjust accordingly.

If you don't have a die cutter like the Sizzix or equivalent brand, you can still work harden, flatten and texture the discs by hammering with the ball part of a ball peen hammer - great metalsmith style! Hammer many times on both sides and also with the flat part of the hammer to make sure the group of cut metal is flat. If you wish to preserve the original color of the can, hammer on a softer surface - an ice hockey puck works too!
Please see the video at the end which shows some other creative texturing tips.

Next mark the centers of the disc groups.
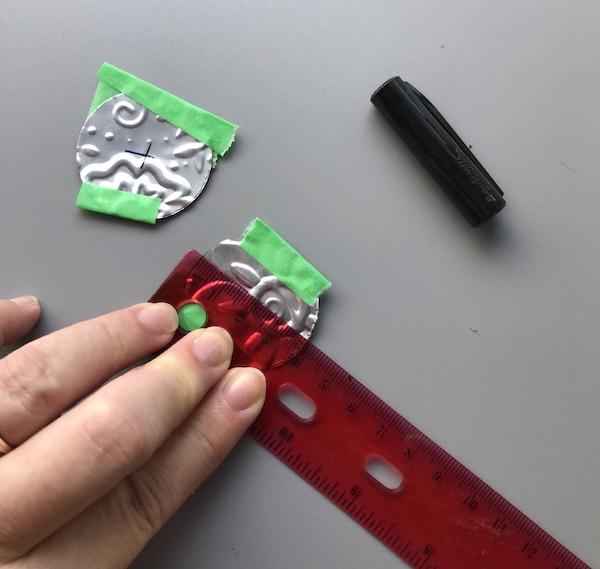
You can use a variety of tools to punch holes. A drill with the right size bit if you have it. Even a nail or an awl. As I have found 2 mm works for the TierraCast 4 mm compression rivets I will be using, I just grabbed my 2 mm hole punch pliers. Their compression rivets are easy to use for professional results. There are also 6 mm versions (ideal for leather riveting) and come different metal colors such as silver, oxidized brass, black plate etc. TierraCast is a US based manufacturer and wholesaler.

There was some bits of metal sticking out at the back so I used flush cutters to remove them and then sanded the edges smooth with a file.

Same thing with the flowers.


I placed the rivet stem from the back through the discs and then stacked 3 flower bits.

Add the rivet cap. Make sure the flower parts are spread out and not overlapping each other.

I used TierraCast's 4 mm rivet setter to set the two rivet parts together. The rivet setting has a concave part which preserves the dome of the rivet cap. You can use any hammer but I do happen to have a riveting hammer. This allows for more delicate blows as heavy ones can distort the rivet. Been there, done that!

The embossing does lock the layers together to some degree. However, the riveting ensures the layers do not separate at all.

It's not easy to keep the layers exactly together during the embossing step. So some trimming might be required.

Some sanding is then required. My friend, Sonya (rocpoet) who is a metalsmith, suggested I use a 4-in-1 nail buffer since the aluminum is a soft metal. Great tip as you can quickly rotate the buffer to get 4 grits.

The last step is to add the ear wires!


What's needed next is some creativity! Here are two more earring variations on the floral theme - a sunflower and a Christmas floral wreath (and other color variations -all are available on my CraftaGems.)


Templates
A pair of scissors and templates can be all you need to cut out soda cans. You can come up with your own or print out shapes from the internet and trace on the metal.
Many of my laser cut wood pieces can also be used for drawing out the shapes. You can either use the solid shapes or the frames. I personally find drawing on the outside of shapes easier than within the frames.

Or you can use any type of commercial stencil.

CoolTools (USA) has many wonderful jewelry shapes such as the fat triangles below. Some fun ones too. They are used by polymer clay, metal clay, and crafters.
If you wish to cut out cookie and candy tins, tin shears and templates like these are what you need. I hesitate to recommend jewelry saws as I personally dislike using them but they are another option. Scissors or a very sharp craft knife if you want to cut out leather and faux leather.

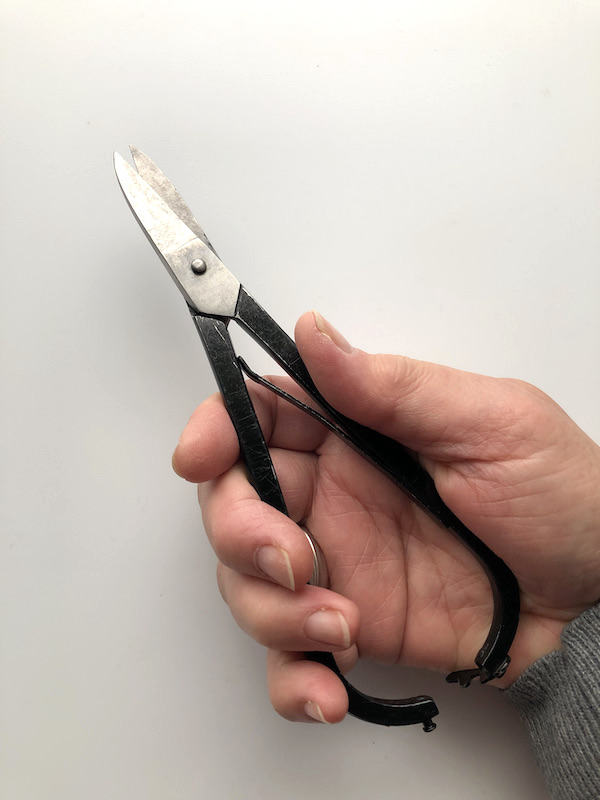
I also tried using tin shears rather than scissors to do the job. Either works but the tin shears is easier on the hand for prolonged use.
As you can see, you can hold the shears in a more open-handed way compared to the cramped fingers when you hold scissors.
Paper punches
Paper punches are quicker to use. I love multi-purpose tools like these!
Here are a couple of creative tips :
Punch the smaller hole first before cutting out the larger circle when making "go-go" 1960's style hoops. This allows you to aim better.
Important - not all punches will work for go-gos. Some of the circle punches I had did not have enough depth for the metal sheet to go further in which in turn prevented the larger punch from working as I wanted.

Consider layering pieces - they do not all have to be the same shape either.

Little Windows has handy sets of punches which are conveniently sized for layered designs. I used the oval and square ones for the examples above. But they have other shapes like circles, rectangles and hearts (below). (Use this code BG1516 for a 15% discount).

More Inspirations
Watch art teacher, Angie of A. H. Szabo Designs demonstrate how to cut and transform the metal into jewelry. Her tutorial shows how she used simple techniques to get texture without special embossing tools. I love how she rubbed the metal on a seashell! Bending metal is another way.
I have seen others use alcohol inks for custom coloring but Angie demonstrates with alcohol-based markers. You will have to seal afterwards either way.
See my post with links to how to flatten can metal as well as how to remove the can colors to up your soda can jewelry game!
Photography
I used my iPhone 8+ and photo editing apps for the tutorial final product photography in natural light. My online class Easy Guide to Smartphone Jewelry Photography is now available. Read more about it here.
Before You Go:
This blog may contain affiliate links. I do receive a small fee for any products purchased through affiliate links. This goes towards the support of this blog and to provide resource information to readers. The opinions expressed are solely my own. They would be the same whether or not I receive any compensation.
______________________________
Original Post by THE BEADING GEM
Going to hang on to this one for when I get a bit more work space. I have pretty much every single supply you mention including a Sizzix machine and some paper punches and Tierracast riveting supplies and one of those can openers (I used to have to feed a previous dog I had wet food and cut myself on the cans all the time). And my husband drinks this water with fruit flavors that comes in tons of different, vibrantly-colored colored cans.
ReplyDeleteGood thinking on the "sharps" container. I do something similar for bent and broken beading needles, keep them all in an empty jelly jar so they don't escape into the trash and poke the trash collectors.
Those can openers are fantastic. That's great you have an easy source of vibrantly colored cans! Our local pharmacies offer sharps containers for needles, razors etc but they are too small for this recycling project!
DeleteI'm wondering if punching aluminum will dull the punches? I never make just one of something, I have to try every configuration!
ReplyDeleteYes, I really like the idea of a sharps container! an old laundry detergent bottle would be good, or a cat litter jug, or..... :)
thanks for sharing!
Yes, the punches will get blunt with time. I am on my second can opener as I wore out the first one! Anything convenient and properly labeled will work!
DeleteSo the paper punches work they just get dull. My plan to recycle the cans is to make those painting size things where you have circles nailed to a board and the wind makes them move. So I would be using it alot. How long you figure they last? Or do you have any other ideas for a tool?
Deleteand, a needle nose plier could curl the ends of those petals under a bit to give dimension.
ReplyDeleteYes, curling the petal ends is an option - see my original tutorial which I linked to at the beginning. Also the book review of aluminum can jewelry.
DeleteLove it! the petals curled are super cute.
Delete
ReplyDeleteI love this idea. Recycling should be what we think of first when we sit down at our benches.
I have a large collection of cans sitting waiting for me and my whiteboard has tons of ideas scribbled on it - all waiting patiently for me to finish renovations.
I love the colours from the cans. That alone opens up tons of possibilities when it comes to working with metal.
I also think people will get quite a kick out of recycled anything! People - and the planet - need us to think along these lines on a regular basis.
Recycle - save the planet!
Totally agree. I like the bright colors but I also like that people can strip the cans of color and use them as canvases!
ReplyDeleteI think it's important to recycle beautifully and this projects fits the idea perfectly!
ReplyDeleteThis is amazing creative fun, Pearl!
ReplyDeleteThanks everyone for your kind comments!
DeleteGreat job, Pearl. This is an excellent tutorial chock full of valuable information. I have been working on a couple of tutorials of my own using aluminum sheets. I will be sure to include a link to this page so people can see your recycled can projects. And learn about so many helpful tools!
ReplyDeleteThanks, Gloria! Looking forward to seeing what you do with aluminum sheets!
DeleteLove this tutorial. What a great way to recycle.
ReplyDeletebonjour pouvons nous mettre un produit dessus pour qu'elle tiennent bien car c 'est leger et coupant par exemple comme de la resine.
ReplyDeleteJe ne recommande pas de mettre quoi que ce soit sur ces boucles d'oreilles. Veuillez les conserver soigneusement. Vous pouvez intégrer les découpes de la canette de soda dans la résine.
Delete