Pearl Blay
giveaway
 The adjectives describing Patricia's polymer beads in last week's giveaway were all superlative - beautiful, stunning, jaw-dropping, lovely,pretty, marvellous and extraordinary. As one commenter, Carol, said, she dearly wanted to be added to the "growing list of opportunists" hoping to win these beads.
Speaking of opportunists, I am one too but not for the beads, lovely though they are. These giveaways give me the opportunity to "meet" the readers who chose to delurk and comment.
One new reader and beader who accidentally stumbled on my blog is Nannie. She wrote about how she hopes beading therapy will help her bring focus in her life as she struggles with a terrible and mysterious neurological condition called narcolepsy. Narcoleptics suffer from excessive daytime sleepiness but what wrecks their lives is the sudden loss of muscle tone or unexpected sleep paralysis - in severe cases, they collapse or fall asleep at inappropriate times. They have zero quality of life. The fact that the awareness ribbon color for this disease is black says it all.
Well Nannie, I hope you will enjoy learning about and making jewelry. Many thanks to all those of you who participated and/or checked out Patricia's shop. I wish a warm welcome to readers and subscribers who have recently joined me on my journey exploring the many "facets" of jewelry and jewelry making.
The lucky winner of this giveaway is Suebeads who was the 33rd commenter - the number random.org generated. Please email me asap beadinggem [at] yahoo [dot] ca to claim your prize.
Didn't win? Look out for the next contest! I highly recommend subscribing either by email or feeds so you never miss a post. Find out more about subscribing here.
Liked what you read? Don't miss a post!
Subscribe via RSS OR Via Email* It's FREE!
*Click on the link in the confirmation email
___________________
The Beading Gem's Journal
The Color of Dreams' Giveaway Winner!
 The adjectives describing Patricia's polymer beads in last week's giveaway were all superlative - beautiful, stunning, jaw-dropping, lovely,pretty, marvellous and extraordinary. As one commenter, Carol, said, she dearly wanted to be added to the "growing list of opportunists" hoping to win these beads.
Speaking of opportunists, I am one too but not for the beads, lovely though they are. These giveaways give me the opportunity to "meet" the readers who chose to delurk and comment.
One new reader and beader who accidentally stumbled on my blog is Nannie. She wrote about how she hopes beading therapy will help her bring focus in her life as she struggles with a terrible and mysterious neurological condition called narcolepsy. Narcoleptics suffer from excessive daytime sleepiness but what wrecks their lives is the sudden loss of muscle tone or unexpected sleep paralysis - in severe cases, they collapse or fall asleep at inappropriate times. They have zero quality of life. The fact that the awareness ribbon color for this disease is black says it all.
Well Nannie, I hope you will enjoy learning about and making jewelry. Many thanks to all those of you who participated and/or checked out Patricia's shop. I wish a warm welcome to readers and subscribers who have recently joined me on my journey exploring the many "facets" of jewelry and jewelry making.
The lucky winner of this giveaway is Suebeads who was the 33rd commenter - the number random.org generated. Please email me asap beadinggem [at] yahoo [dot] ca to claim your prize.
Didn't win? Look out for the next contest! I highly recommend subscribing either by email or feeds so you never miss a post. Find out more about subscribing here.
Liked what you read? Don't miss a post!
Subscribe
via RSS OR Via Email* It's FREE!*Click on the link in the confirmation email
___________________
The Beading Gem's Journal
Pearl Blay
bracelet
necklace
tutorial
video tutorial
 FireNFusion is a Wisconsin based glass artisan who has both an Etsy store and her own website, Dichroic Jewelry and More. She posted a really cool tutorial on her blog how to make a fried marble pendant necklace. Thanks Nikki for updating this link!
The marbles aren't actually fried in oil but baked in a really hot oven and then rapidly cooled in iced water. Some marbles will break apart but you can glue bead caps with wire loops on the survivors to make pendants. This is probably how crackle beads are made.
Now marbles have no holes so here are other ways to incorporate them into jewelry :
1. Don't have a bead cap with a loop?
Not a problem, head on over to Beading Daily for their free tutorial on how to create a wire bail for a marble shown below.

2. If you don't like to use glue, then you could make a wire cage.
Studioheath.com has a great free cage pendant tutorial. (update : link no longer available) The SeaGlassLady also on eHOW shows a more informal style of marble wire wrapping (shown below, link is now dead).

Plaidbunny over at the Sweater Surgery blog also demonstrates a lightly wire netted technique she tried from a book.
3. Want to make something other than a pendant?
Then make the classic double looped wire cage which you can incorporate into bracelets and necklaces. This excellent tutorial by Jinn on Wet Canvas shows you not only how to make the wire cage but also twist wire to form the bracelet below :

The Crafts Channel on Youtube also has a wire cage video tutorial which shows the main steps to make this type of cage. However this video tutorial uses a drilled round bead. The instructor feeds an eye pin through the bead covered with the decorative cage. Parts of the video are difficult to see as the view was often blocked by the instructor's hands. You'll get the picture though.
Via
______________________________
Original Post by THE BEADING GEM
Jewelry Making Tips - Jewelry Business Tips
How to Fry Marbles and Make Crackle Bead Jewelry
 FireNFusion is a Wisconsin based glass artisan who has both an Etsy store and her own website, Dichroic Jewelry and More. She posted a really cool tutorial on her blog how to make a fried marble pendant necklace. Thanks Nikki for updating this link!
The marbles aren't actually fried in oil but baked in a really hot oven and then rapidly cooled in iced water. Some marbles will break apart but you can glue bead caps with wire loops on the survivors to make pendants. This is probably how crackle beads are made.
Now marbles have no holes so here are other ways to incorporate them into jewelry :
1. Don't have a bead cap with a loop?
Not a problem, head on over to Beading Daily for their free tutorial on how to create a wire bail for a marble shown below.

2. If you don't like to use glue, then you could make a wire cage.
Studioheath.com has a great free cage pendant tutorial. (update : link no longer available) The SeaGlassLady also on eHOW shows a more informal style of marble wire wrapping (shown below, link is now dead).

Plaidbunny over at the Sweater Surgery blog also demonstrates a lightly wire netted technique she tried from a book.
3. Want to make something other than a pendant?
Then make the classic double looped wire cage which you can incorporate into bracelets and necklaces. This excellent tutorial by Jinn on Wet Canvas shows you not only how to make the wire cage but also twist wire to form the bracelet below :

The Crafts Channel on Youtube also has a wire cage video tutorial which shows the main steps to make this type of cage. However this video tutorial uses a drilled round bead. The instructor feeds an eye pin through the bead covered with the decorative cage. Parts of the video are difficult to see as the view was often blocked by the instructor's hands. You'll get the picture though.
Via
______________________________
Original Post by THE BEADING GEM
Jewelry Making Tips - Jewelry Business Tips
Pearl Blay
body jewelry
bridal
celebrity jewelry
unusual jewelry


Some innovative couples have found a novel way to declare their love and seal their marriages. Instead of buying rings which could be lost and cost money to boot, they are getting rings tattooed instead! Skin rings could also be substitutes until the couple can afford rings. For safety reasons, real rings are also not a good idea for anyone working in construction or with machinery.
In the past, people used to have their wedding date engraved on their rings. Now some people ink it in on skin! Surely the tattoos which put a smile on my face is the "I do" and "Ditto" pair!


Tattoos require a strong commitment to each other for they are not easy to remove. Many people including celebrities have gone the tattoo route only to have to ditch them when their relationships floundered.
The best known ring tattooed celebrity is the inflatable Canadian born blonde bombshell Pamela Anderson who had to have her ring tattoo initially changed from "Tommy" to "Mommy" after she divorced Tommy Lee, the much tattooed Motley Crue drummer (both shown above).
Other celebrity mistakes when love flitted away involved much larger arm tattoos. Johnny Depp had to modify his "Winona Forever" on his arm to "Wino Forever". Best yet, Angelina Jolie had her Billy Bob Thornton (and dragon) tattoo erased and replaced with new ones showing the geographic coordinates of the birthplaces of her children. She may have had the laser removal but you can still see the faint traces of the dragon.
Via,Via and Via
______________________________
Original Post by THE BEADING GEM
Jewelry Making Tips - Wire JewelryTips -Jewelry Business Tips
Inking Your I Dos - Wedding Ring Tattoos


Some innovative couples have found a novel way to declare their love and seal their marriages. Instead of buying rings which could be lost and cost money to boot, they are getting rings tattooed instead! Skin rings could also be substitutes until the couple can afford rings. For safety reasons, real rings are also not a good idea for anyone working in construction or with machinery.
In the past, people used to have their wedding date engraved on their rings. Now some people ink it in on skin! Surely the tattoos which put a smile on my face is the "I do" and "Ditto" pair!


Tattoos require a strong commitment to each other for they are not easy to remove. Many people including celebrities have gone the tattoo route only to have to ditch them when their relationships floundered.
The best known ring tattooed celebrity is the inflatable Canadian born blonde bombshell Pamela Anderson who had to have her ring tattoo initially changed from "Tommy" to "Mommy" after she divorced Tommy Lee, the much tattooed Motley Crue drummer (both shown above).
Other celebrity mistakes when love flitted away involved much larger arm tattoos. Johnny Depp had to modify his "Winona Forever" on his arm to "Wino Forever". Best yet, Angelina Jolie had her Billy Bob Thornton (and dragon) tattoo erased and replaced with new ones showing the geographic coordinates of the birthplaces of her children. She may have had the laser removal but you can still see the faint traces of the dragon.
Via,Via and Via
______________________________
Original Post by THE BEADING GEM
Jewelry Making Tips - Wire JewelryTips -Jewelry Business Tips
Pearl Blay
gemstone
supplies and displays


Up here in the north eastern corner of North America, we are geologically blessed with natural wonders. The Bay of Fundy lays claim to the world's highest tides. The vertical tidal range is about 50 feet which means you could be in a boat over water the depth equivalent to a 5 story building and yet 6 hours later, that boat would be on the ocean floor.
The area is rugged, beautiful and a haven for dinosaur fossil fans and rockhounds. If you know where to look, you could find gemstones such as agate (banded agate shown above), amethyst, opal, and jasper. This website lists good locations some of which are harder to get to or require guides and caution. Amethyst Cove for example, has no safe spot to retreat to if you get caught with the incoming tide. The tide moves in very fast - at the pace of a very brisk walk.
So that's where Debbie and I were last week for our kind of rockhounding! Picking up gem supplies for our workshops. One wholesale supplier we visited was Rainbow Minerals from Ottawa. I first met Al, one of the owners several years ago when I was just starting my business. He and his sister Ash proved helpful and friendly over the years. Ash kindly let me take pictures of their booth this time. Know something, Ash? It might help to have paper bags handy because Debbie and I almost hyperventilate every time we see the gemstone displays!


Liked what you read? Don't miss a post!
Subscribe via RSS OR Via Email It's FREE!
___________________
The Beading Gem's Journal
Gems and Gem Show at the Bay of Fundy


Up here in the north eastern corner of North America, we are geologically blessed with natural wonders. The Bay of Fundy lays claim to the world's highest tides. The vertical tidal range is about 50 feet which means you could be in a boat over water the depth equivalent to a 5 story building and yet 6 hours later, that boat would be on the ocean floor.
The area is rugged, beautiful and a haven for dinosaur fossil fans and rockhounds. If you know where to look, you could find gemstones such as agate (banded agate shown above), amethyst, opal, and jasper. This website lists good locations some of which are harder to get to or require guides and caution. Amethyst Cove for example, has no safe spot to retreat to if you get caught with the incoming tide. The tide moves in very fast - at the pace of a very brisk walk.

 If you look at the map above, somewhere on the right fork of the head of the Bay of Fundy is the tiny town of Parrsboro (picture source). Tourism is its main industry.

So that's where Debbie and I were last week for our kind of rockhounding! Picking up gem supplies for our workshops. One wholesale supplier we visited was Rainbow Minerals from Ottawa. I first met Al, one of the owners several years ago when I was just starting my business. He and his sister Ash proved helpful and friendly over the years. Ash kindly let me take pictures of their booth this time. Know something, Ash? It might help to have paper bags handy because Debbie and I almost hyperventilate every time we see the gemstone displays!


Liked what you read? Don't miss a post!
Subscribe
via RSS OR Via Email It's FREE!___________________
The Beading Gem's Journal
Pearl Blay
bracelet
earrings
feature designer
necklace
wire work
 We have a lot fun at workshops making wire crochet bracelets. The braided style is easy for beginners but what about other types of wire crochet?
Adriana Laura Mendez the artisan behind Zircon Jewels (link no longer works) is from Buenos Aires, Argentina and what she does with wire crochet and weaving is truly awesome. I had a hard time trying to choose a few designs for this feature post!
She considers her designs unconventional because the work is not based on patterns but come about through her honed "technical skills, imagination, dedication and passion". She is not influenced by fads and trends. Her goal is to make her pieces timeless.
Shown above is her gold and silver cuff. I love how she made it look like a real sleeve cuff. Below is another bracelet with a large rhodochrosite cabochon.

Her copper tube necklace with pearls and gemstones is another stunner.

Her netted crystal earrings does show off her technical skills.

Check out what Adriana is up to on her blog - she has added a translation tool there if you need it. But I'll bet you won't as you'll be too busy drooling over her designs.
______________________________
Original Post by THE BEADING GEM
Jewelry Making Tips - Jewelry Business Tips


Awesome Crochet Wire Jewelry by Zircon Jewels
 We have a lot fun at workshops making wire crochet bracelets. The braided style is easy for beginners but what about other types of wire crochet?
 Adriana Laura Mendez the artisan behind Zircon Jewels (link no longer works) is from Buenos Aires, Argentina and what she does with wire crochet and weaving is truly awesome. I had a hard time trying to choose a few designs for this feature post!
She considers her designs unconventional because the work is not based on patterns but come about through her honed "technical skills, imagination, dedication and passion". She is not influenced by fads and trends. Her goal is to make her pieces timeless.
Shown above is her gold and silver cuff. I love how she made it look like a real sleeve cuff. Below is another bracelet with a large rhodochrosite cabochon.

Her copper tube necklace with pearls and gemstones is another stunner.

Her netted crystal earrings does show off her technical skills.

Check out what Adriana is up to on her blog - she has added a translation tool there if you need it. But I'll bet you won't as you'll be too busy drooling over her designs.
______________________________
Original Post by THE BEADING GEM
Jewelry Making Tips - Jewelry Business Tips
Pearl Blay
beader design
bracelet
wire work


We often have fun making wire and bead crochet bracelets at our workshops. One thing we don't get hung up on is bead placement. We just go with the flow. Beaders are encouraged to string the beads according to any order they wish. Here we see two results of the laid back approach.
Sheri worked with glass chip beads and the black, blue and pink ones on the three strands which then somehow clustered together on her bracelet. Evelyn's bracelet though had the transparent purple rectangular and whitish beads spaced evenly.Serendipity rules!
For the wire crochet tutorial check here. For more tutorials check out my Jewelry Making Tips
Beader Designs #: 549-550
Liked what you read? Don't miss a post!
Subscribe via RSS OR Via Email It's FREE!
___________________
The Beading Gem's Journal
Two Copper Wire and Bead Bracelets


We often have fun making wire and bead crochet bracelets at our workshops. One thing we don't get hung up on is bead placement. We just go with the flow. Beaders are encouraged to string the beads according to any order they wish. Here we see two results of the laid back approach.
Sheri worked with glass chip beads and the black, blue and pink ones on the three strands which then somehow clustered together on her bracelet. Evelyn's bracelet though had the transparent purple rectangular and whitish beads spaced evenly.Serendipity rules!
For the wire crochet tutorial check here. For more tutorials check out my Jewelry Making Tips
Beader Designs #: 549-550
Liked what you read? Don't miss a post!
Subscribe
via RSS OR Via Email It's FREE!___________________
The Beading Gem's Journal
Pearl Blay
bracelet
business tips
tips and tricks
tutorial
How to Add Jewelry to Photos using Photoshop Elements Tutorial
This tutorial was inspired by Spoonfed Design's Photoshop tutorial on how to place jewelry images onto other photographs. The picture you see on the left is a composite of a stock picture showing a hand and one of my tiger eye bangle bracelets.


The Spoonfed Design blog uses the full Adobe Photoshop software which is too expensive for most of us. So I tried it out using the simplified, much easier to use and also considerably cheaper version called Adobe Photoshop Elements which I highly recommend. I also had some invaluable pointers from my 14-year-old daughter who is a whiz on this program.
The basic steps are the same whatever program you use - Coreldraw or the free GIMP software. You'll just have to find the equivalent tools or procedures and realize each software will use different terminology.
1. First find photos that are likely to go together. It doesn't have to be a model - perhaps a different background like a sandy beach or whatever. Open both up in Photoshop Elements.
2. Resize one or the other photo so the relative sizes look okay because you are going to copy and paste the jewelry onto the main picture.

3. Now get rid of the outside background in the jewelry picture. Select the magic tool on the vertical menu. Play around with the tolerance number (top circle) - I used 50- so that when you click with the cursor anywhere on the outside background of the jewelry picture, a "marching ants" border appears. This border will show you the area that will disappear when you hit the delete button.

4. Now try clicking inside the bracelet. If the marching ants border is okay with you, then delete. To clean up the remaining background, switch to lower tolerance numbers - I used 20. Don't worry if you haven't got it perfectly removed.
5. Now select the repositioning and rotating tool (circled below)so you can grab the bracelet and put it where you want it to go in as natural a position as possible.

6. The next tool to select is the eraser tool on the vertical menu. Set the brush size (up top) to however wide you need it to be - big to erase large areas, small to tidy up the little ones. You may wish to zoom in to see better.

7. Clean up the little areas with either the magic tool or the eraser.
8. As the jewelry looks a lot sharper than the background, the bangle needs to be blurred. So for the final step, create a new layer (check the help for layer info) and give it a Gaussian blur to soften the bangle itself.
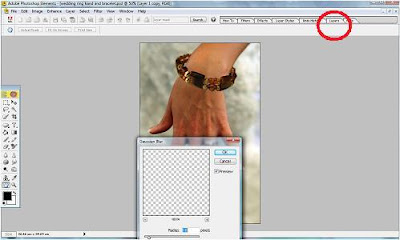
This was a quick effort on my part. So the composite picture is not perfect by any means. But you get the picture (pun intended)! Isn't technology cool?
______________________________
Original Post by THE BEADING GEM
Jewelry Making Tips - Jewelry Business Tips


The Spoonfed Design blog uses the full Adobe Photoshop software which is too expensive for most of us. So I tried it out using the simplified, much easier to use and also considerably cheaper version called Adobe Photoshop Elements which I highly recommend. I also had some invaluable pointers from my 14-year-old daughter who is a whiz on this program.
The basic steps are the same whatever program you use - Coreldraw or the free GIMP software. You'll just have to find the equivalent tools or procedures and realize each software will use different terminology.
1. First find photos that are likely to go together. It doesn't have to be a model - perhaps a different background like a sandy beach or whatever. Open both up in Photoshop Elements.
2. Resize one or the other photo so the relative sizes look okay because you are going to copy and paste the jewelry onto the main picture.

3. Now get rid of the outside background in the jewelry picture. Select the magic tool on the vertical menu. Play around with the tolerance number (top circle) - I used 50- so that when you click with the cursor anywhere on the outside background of the jewelry picture, a "marching ants" border appears. This border will show you the area that will disappear when you hit the delete button.

4. Now try clicking inside the bracelet. If the marching ants border is okay with you, then delete. To clean up the remaining background, switch to lower tolerance numbers - I used 20. Don't worry if you haven't got it perfectly removed.
5. Now select the repositioning and rotating tool (circled below)so you can grab the bracelet and put it where you want it to go in as natural a position as possible.

6. The next tool to select is the eraser tool on the vertical menu. Set the brush size (up top) to however wide you need it to be - big to erase large areas, small to tidy up the little ones. You may wish to zoom in to see better.

7. Clean up the little areas with either the magic tool or the eraser.
8. As the jewelry looks a lot sharper than the background, the bangle needs to be blurred. So for the final step, create a new layer (check the help for layer info) and give it a Gaussian blur to soften the bangle itself.

This was a quick effort on my part. So the composite picture is not perfect by any means. But you get the picture (pun intended)! Isn't technology cool?
______________________________
Original Post by THE BEADING GEM
Jewelry Making Tips - Jewelry Business Tips
Pearl Blay
high tech
news stories
rings
 Cool Technology
Part 1 of 2
I don't own an iPhone but it sure is tempting with all the cool apps you can get for it. You can even make phone calls with it too - imagine that! One app that will soon be available in late summer is the free Live Diamond Try On iPhone app. This is a partnership between Stuller and Gemvision Corp.
The app lets you to choose a diamond from Red Box Diamonds and design an engagement ring you like no matter where you are.
You take a photo of your own hand with the phone's camera and virtually "try on" the ring to see if the design suits! Placing the iPhone on your hand and tilting it will allow you to check the diamond's sparkle.
There will also be a "find a jeweler" function once you are certain of the ring. Users can even email a picture of the ring to their friends and family - what a way to announce an engagement!
Via and Via
Liked what you read? Don't miss a post!
Subscribe via RSS OR Via Email It's FREE!
___________________
The Beading Gem's Journal
Live Diamond Try-On -iPhone App for Ring Shopping
 Cool Technology
Part 1 of 2
I don't own an iPhone but it sure is tempting with all the cool apps you can get for it. You can even make phone calls with it too - imagine that! One app that will soon be available in late summer is the free Live Diamond Try On iPhone app. This is a partnership between Stuller and Gemvision Corp.
The app lets you to choose a diamond from Red Box Diamonds and design an engagement ring you like no matter where you are.
You take a photo of your own hand with the phone's camera and virtually "try on" the ring to see if the design suits! Placing the iPhone on your hand and tilting it will allow you to check the diamond's sparkle.
There will also be a "find a jeweler" function once you are certain of the ring. Users can even email a picture of the ring to their friends and family - what a way to announce an engagement!
Via and Via
Liked what you read? Don't miss a post!
Subscribe
via RSS OR Via Email It's FREE!___________________
The Beading Gem's Journal
Subscribe to:
Posts (Atom)